Tag Archives | 2013

Veterans Day, Sgt Ted Miyamoto


Veterans Day, Ted Miyamoto


Veterans Day is a day to honor all American military personnel  who served in the military {both living and those who are no longer with us}.

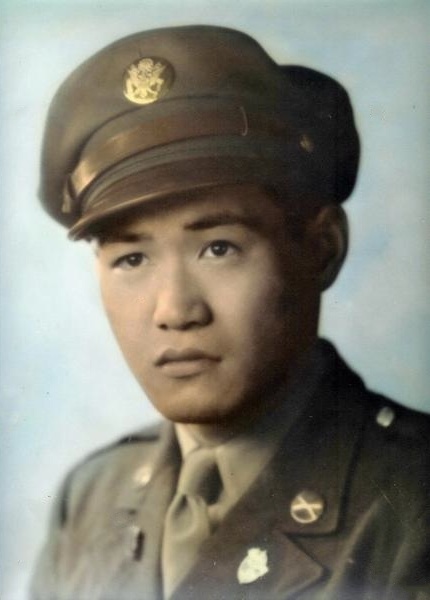
This Veterans Day I would like to honor my Grandfather, Ted Miyamoto.  He enlisted in the army soon after the attack on Pearl Harbor and became a member of the 442nd Regimental Combat Team, a segregated Japanese-American unit.  His unit was sent to Europe to be on the front lines where they experienced some of the most intense fighting.  Ted’s courage and bravery was evident when he took out a German tank “head on” and with the help of a comrade took out a second tank. They were one of the most decorated units in the military. Ted was awarded the Bronze Star and the Purple Heart after his combat ended.

Verterans Day,  Purple Heart & Bronze Star

In 2005, Ted Miyamoto died at the age of 83 and was laid to rest in his home town of Cheyenne, Wyoming.

On November 2nd, 2011, a ceremony was held in Washington DC  at the Capital to award the Congressional Gold Medal to Ted Miyamoto and other veterans of the 100th Infantry Battalion, the 442nd Regimental Combat Team.  This is the highest civilian honor that can be given by Congress in recognition of exceptional service, sacrifice and  loyalty to the country.

Veterans Day Congressional Gold Medal

Medal Design

The medal’s obverse (heads side) was designed by United States Mint Artistic Infusion Program Master Designer Joel Iskowitz and sculpted by United States Mint Sculptor-Engraver Charles L. Vickers. The design features Nisei (second-generation Americans of Japanese ancestry) Soldiers from both the European and Pacific theaters. The 442nd RCT color guard is depicted in the lower field of the medal. The inscriptions on the outer rim are NISEI SOLDIERS OF WORLD WAR II and GO FOR BROKE, the motto of the 442nd RCT, which was eventually used to describe the work of all three units.

The medal’s reverse (tails side), designed and sculpted by United States Mint Sculptor-Engraver Don Everhart, depicts the insignias of the 100th INF BN, 442nd RCT, and MIS. The 100th INF BN insignia features a taro leaf and a traditional Hawaiian helmet, both of which are emblematic of the unit’s Hawaiian roots. The “Go for Broke” Torch of Liberty shoulder patch represents the 442nd RCT. The sphinx, a traditional symbol of secrecy, represents the MIS insignia. The inscriptions on the outer rim are the abbreviated titles of the three units represented on the medal – the 100th INF BN, 442nd RCT, and MIS. In addition, the years 1941-1946, the defined years of World War II according to the Department of Defense, are inscribed in the upper right field of the medal. A decorative ribbon connects the outer rim with the inscriptions ACT OF CONGRESS and 2010. The three stars positioned along the border represent the three units being honored. {www.goforbroke.org}

.

Veterans Day red white blue banner

Thank you Veterans for your service to our country!

Dan Coakley (Army) · Vern Cook (Army) · Paul Keating (Marines) ·  Steve Miyamoto (Air Force, navigator) ·  Ted Miyamoto (Army)  · Bud  Morris (Coast Guard) · Chip Morris (Army) · Norm Morris (Coast Guard & National Guard) · Chris Swan (Navy) ·  Frederick W. Swan Jr. (Army)  ·  Glenn Szalay (Air Force) · Ted Weigold (Marines)

sources/ images:  Go For Broke  ⎜ Wyoming News  ⎜ Wikipedia: Bronze Star Medal & Purple Heart

………………………………………………………………………………………………..

posted by: Kay

4 comments

November {a little this & a little that…}

our chicken, Ms Ellie

This is Ms. Ellie, one of our 7 chickens.

our chicken, Ms Ellie

Ms. Ellie has been living in our house for the past few months.  Still not sure what is wrong with her, but she is doing better.  I have been trying to get her back with the flock, but not quite there yet.  I am very hopeful, just one of the chickens still  likes to peck her {any advice will be greatly appreciated on this subject}.  She does go out and mingle with the other chickens during the daytime and at night, her home is in the our house.  The first time I forgot to bring her back in, the search began with a flashlight and calling for her {I don’t think that helped} just to comfort my anxiety.  She was nowhere to be found. Finally, my daughter Hannah called me to look out the back door to see Ms. Ellie waiting patiently to come inside.  I haven’t had any problems finding her now.

.little green pumpkins

Although it’s late in the season, I finally started to clean the garden.  These little green pumpkins are just some that I’ve collected, not sure what to do with them yet. I will keep you posted on that.   apples

 It’s time to pick the last remnant of apples for my applesauce and put away my favorite old rickety ladder.

  .

applesauce

Already made four batches of applesauce, one more to go and I will be done.  I put a little twist on the recipe the last time I made it and substituted 1/2 pound of cranberries and added a little more sugar.  It turned out great.  {find the recipe Here}

moss

It’s moss season, actually it’s moss season year round… just more now and into spring time. These branches are simply beautiful to look at, the variety, colors and textures in one area.  I think a wreath may be a d.i.y. project in the near future.  I love using them in decorations, but not so much when they completely take over the yard like unwanted weeds.

fall colors & geese

A drive around town to see the fall colors.

 Fall City farms and mountains

A view of farm lands and mountains in the distance.

. . . . . . . . . . . . . . . . . .

Ideas are stirring in my head while putting this post together.  Can’t wait to try them and if successful, I’ll be sharing with other things this November!

………………………………………………………………………………………………..

posted by: Kay

2 comments

Halloween & Spider Webs

Spider Web 1

God’s little creatures created this beautiful web in my garden along with the other two in the pictures shown below.  It was early in the morning with just enough dampness in the air for the tiny water droplets to still be clinging to every part of the web.  The intricate detail of it all glistened and sparkled the moment light hit it.

.

Spider Web 5

A close-up of the water droplets on the spider web….. amazing!

.

Spider Web 4

A spider’s day of work completed.

Have a fun & safe Halloween everyone!

………………………………………………………………………………………………..

posted by: Kay

2 comments

Simple Halloween Packaging {test tubes & paper bags}

Two quick and easy packaging ideas for Halloween using
plastic test tubes and paper bags.

Packaging Halloween Treats, Test Tubes

.

Packaging Halloween Treats, Test Tubes

.

Packaging Halloween Treats, Test Tubes

SUPPLIES

plastic test tubes {Martha Stewart craft supplies}
decorative tape {Washi tape}
double-sided tape
specimen No 3” label & more at Paging Supermom {print here}
treats {M & Ms}

DIRECTIONS

Fill a test tube with treats and close it up with a cork.  Attach a piece of decorative tape {about 3 1/2- 4 inches long} at the top of the cork and down the sides of the plastic test tube to prevent the cork from coming loose.  Repeat the process until all the treats or the test tubes are gone.  Take the label and attach it with the double-sided tape on the container for the test tube treats.

. . . . . . . . . . . . . . . . . . . . . .

.

.

Halloween Packaging with Paper Bags

.

Halloween Packaging with paper bags

SUPPLIES

glassine bags {4″ x 6 3/4″}
small chevron paper bags {2 3/4″ x 4 1/2″}
black twine
decorative tape {Washi tape}
treats & toys

DIRECTIONS

Fill both bags with treats/toys, fold the openings over and tape them up.  Stack the small bag on top of the large bag and tie them together with twine.


. . . . . . . . . . . . . . . . . . . . . .

 Halloween display / Printables / Spiders & Insects

1.printable / spiders & insects  2.printable labels & tags / spiders & insects  3.chocolate pretzel spider web treats  4.packaged treats in paper pumpkins  5.packaged treats in test tubes  6.packaged treats in paper bags

 Have fun with these Halloween packaging ideas!

………………………………………………………………………………………………..

posted by: Kay

0 comments

Mini Paper Pumpkins {with treats}

Halloween ~ Mini Paper Pumpkins with Treats

The inspiration for this paper pumpkin idea came from
Martha Stewart’s pumpkin favor pouches for Halloween.

These mini paper pumpkins are adorable and easy to make.  I will be showing two similar methods with a slight variation using crepe paper or crepe paper streamers.  This came about when I couldn’t find crepe paper at the local stores but they all had crepe paper streamers available.  Eventually I got it, just had to drive a little further.  If you don’t need it right away, order it online for the best color selections, or spend less money and use crepe paper streamers.  Both methods worked great and as a result I wanted to share them with you.

.

 Halloween ~ Mini Paper Pumpkins with Treats

SUPPLIES

crepe paper / crepe paper streamers
green floral tape
white paper cupcake liners/cups
double-sided tape
ruler
scissors
pencil
paper plate {9″-10″diameter}
sweet treats
. . . . . . . . . . . . . . . . . . . . . .

Halloween, paper pumpkins

Halloween, Mini Paper Pumpkins with Treats

step 1
Cut 4 long strips of crepe paper streamers {10 inches in length each}.  On a flat surface, place one paper streamer down and stick a piece of double-sided tape on top and at the center. Take the second crepe paper streamer and place it on top of the first one to make a criss-cross pattern.  Press the two middle sections together.  Repeat the process with the third and fourth crepe paper streamers to form a circle.

step 2
Attach a paper cupcake liner to the center of the crepe paper streamers using double-sided tape.  All the pieces should be attached to each other at the center of the circle {see step 2 image}.

steps 3 & 4
Fill the paper cupcake liner with treats.

To form the pumpkin, take two paper streamer ends opposite each other and bring them to the center above the paper cupcake liner.  Hold them in place and repeat this process with the other paper streamers to form a loose ball-like shape.

step 5
To form the stem, twist the crepe paper ends together with one hand to enclose the treats in the paper cupcake cup.  Use the other hand to gently squeeze and shape the body of the pumpkin while holding it in place.

step 6
Cut one 10″ long piece of green floral tape

steps 7 & 8
Start at the base of the stem, twist the floral tape several times around in the same direction as the twisted stem. Gently pull on the floral tape while twisting it around to make it stick together and to tighten the loose stem.  Once the base is secured, start twisting the floral tape in a spiral up the stem to cover the orange paper streamers.

steps 9 & 10
To finish the pumpkin, take a pencil and wrap the stem around it to give the pumpkin a little curl.

. . . . . . . . . . . . . . . . . . . . . .


.

Halloween, paper pumpkins

Halloween, Mini Paper Pumpkins with treats

step 1
Place a paper plate on top of the crepe paper and trace around the outer edges with a pencil. Cut out the crepe paper circle.

steps 2 & 3
Place a piece of double-sided tape at the center of the crepe paper circle and attach a paper cupcake liner to it.  Fill the cup with treats.  Gather the outer edges of the crepe paper and bring it to the center above the paper cupcake cup  to form a loose paper ball shape.

note: the stem on this pumpkin will be a little thicker than the pumpkin made from
crepe paper streamers.

step 4
To form the stem, twist the crepe paper edges together with one hand to enclose the treats in the paper cupcake cup.  Use the other hand to gently squeeze and shape the body of the pumpkin while holding it in place.

steps 5 & 6
Cut one 10″ long piece of green floral tape

Start at the base of the stem, twist the floral tape several times around in the same direction as the twisted stem. Gently pull on the floral tape while twisting it around to make it stick together and to tighten the loose stem.  Once the base is secured, start twisting the floral tape in a spiral up the stem to cover the orange paper streamers.

steps 7 & 8
Finish the pumpkin, take a pencil and wrap the stem around it to give the pumpkin a little curl.

. . . . . . . . . . . . . . . . . . . . . .

Halloween ~ Mini Paper Pumpkins with Treats

. . . . . . . . . . . . . . . . . . . . . .

.

See All The Halloween Ideas {here}

 Halloween display / Printables / Spiders & Insects

Halloween Display

1.printables/spiders & insects  2.printable labels & tags / spiders & insects  3.chocolate pretzel spider web treats  4.packaged treats in paper pumpkins  5.packaged treats in test tubes  6.packaged treats in paper bag


………………………………………………………………………………………………..

posted by: Kay

Related Posts Plugin for WordPress, Blogger...
2 comments